
The Creativity Matrix: 81 Cocktails, 12 Ingredients
@pewpew.productions
Ever wondered how mixologists come up with those incredible flavour combinations? Feel like getting creative? Well, here come some recipes to get those creative juices flowing!
But they’re not just recipes, they are proof of concept. They give you a pattern that you can follow to make not just 81 different cocktails, but an infinite amount! The only limit is your creativity!
So here’s what you can expect in the next few minutes of reading:
A guide to making at least 81 delicious cocktails that are better than most bars out there!
Tips and tricks on how to choose the right combination of ingredients
5 recipes for homemade ingredients that you can easily adjust and adapt to your own creative ideas;
3 recipes for garnishes made out of the leftovers.
Are you ready? Then let’s get started!
The Terrific 12
First let me introduce the 12 ingredients, most of which can be found in most bars or are simple enough to make yourself - no fancy equipment needed.
As I mentioned before this is also a proof of concept - a.k.a the concept introduced in the previous blog. If you haven’t read it you can do that here.
In any case the original DNA of the Punch will be the template for all 81 drinks. So: Sweet, Sour, Spirit, Seasoning, Water. While the water source will be dilution from the ice in all 81 drinks, here is the list of the other ingredients by category:
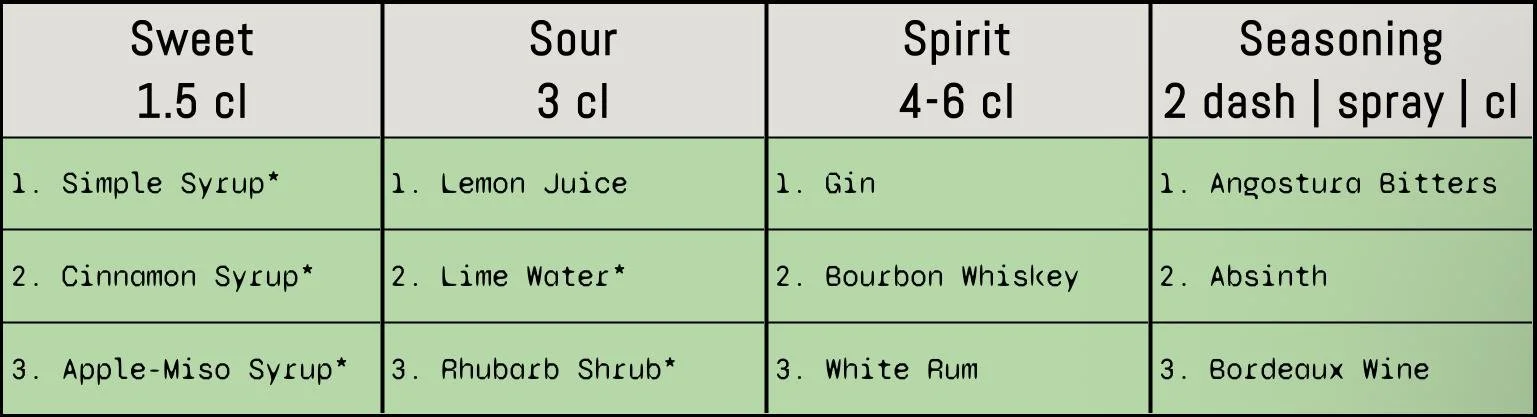
Now! If you combine the indicated amount of any ingredient from one category with any of the other ingredients from the other categories you are going to be making a banger drink! It’s a matrix for making it your own.
Let me give you a few examples to make it clear:
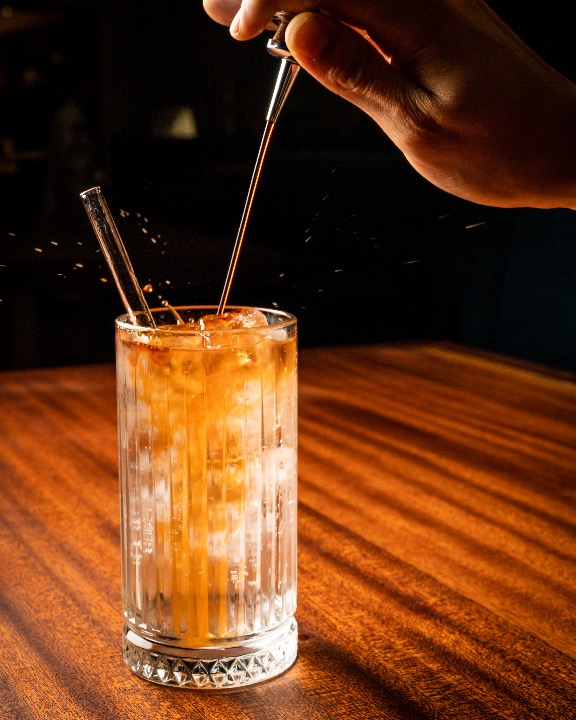
If you combine the ingredients from the first row you get a very well balanced Gin Sour with more aromatics from the Angostura.
Switch out the lemon juice for the lime water and all of a sudden you have a more interesting Gin Gimlet! If you switch out the simple syrup with the cinnamon or apple-miso syrup you are creating christmas vibes or a funky umami blast respectively. You could of course switch up the spirit or seasoning as well and I can tell you one of those combinations is the recipe for a New York Sour… Do you know which?
Why Is This Helpful?
Thinking in patterns like this and understanding building drinks this way provides you with an arsenal of possibilities. If a guest comes in and wants something different you can easily apply this method to create something that has probably been created before, but for your guest and possibly for you it will be a new creation! This methodology is also very useful when creating seasonal menus. The building blocks are clear, just check what is in season and adapt the homemade ingredients to that.
Simplifying cocktail recipes like this makes it easier for new team members to learn the signature drinks and retain them. Remember the 6 ‘S’?
Now here are some tips and tricks to help you make the right choices. Though you could of course shake all the variations and get decent results, there are some guidelines that help you get great results. You should always be asking why! Why am I doing it like this and not like that? And the answer should definitely not be: “Because that’s how I was taught.”
Here are some general reasons for common decisions that have to be made when creating a cocktail.
Shaken or Stirred?
When it comes to this question the simplest answer is: if it has juice, cream or egg in it then shake. If it is only clear spirits then stir. It will work most of the time, though there are a few classics that ignore this rule and I believe that you should test it for yourself. After all, The Savoy Cocktail book from 1930 by Harry Craddocks calls for all Martinis to be shaken.
Here are some facts about both techniques:
Shaking cools and dilutes faster than stirring. But they will both reach a point of maximum dilution, when the temperature is below 0°C. This just takes longer when stirring.
Shaking ariates the drink more than stirring, as it beats in bubbles of air into the drink. This is what froths the juice, cream or egg white in drinks.
Shaking usually looks cooler than stirring. But it is also louder.
When to Add the Seasoning?
There are reasons for adding the seasoning to the drink with the other ingredients and reasons to add it on top or in the end.
Do you want the seasoning to have a visual effect on the drink? Then season after. A dash of Angostura bitters or a red wine float have an appeal.
If you want a balanced flavour throughout the drinking experience, then mix it in with the other ingredients.
A spray on top can give the nose a hint of an ingredient without changing the entire flavour of the drink. If you spray Absinth inside the drink instead of on top, the anise note is not as dominant in the nose.
Serve on Ice Or Straight?
This is a simple one! Do you want your drink to stay cold longer and can the drink take some dilution without losing its essence? Then serve on ice. You can slow the dilution with bigger dryer ice cubes or by coating the ice cubes in fat like coconut oil or chocolate.
If dilution would change the drink for the worse, then straight up. If you want the drink to stay cold longer then make the portion smaller. Some drinks actually benefit from a rising temperature. For me, the Sidecar is an example of that!
How to Garnish?
I am a big fan of finding a purpose for leftovers from the production of the homemade ingredients. And garnishes are a great purpose. They tie together the same elements of the story: What’s on the inside is also on the outside, in a different form and thereby add complexity. And they give you another outlet for your creativity!
Following this philosophy, these are the garnishes I went with:
Lemon peel peel the lemons before juicing.
Apple crackers made of the leftovers of the Apple-Miso syrup
Rhubarb Gel made of the pulp from juicing the rhubarb. I served it on top of salty bread chips for a nice contrast.
Rhubarb leather from the pulp used for the gel. I cut them into rectangles and rolled them up to look like cinnamon sticks.
You can find the recipes for all of them later.
Using Rich Simple Syrup vs Simple Syrup?
A lot of new bartenders I talked to liked to tell me how they used to do things in the last place they worked, like using Simple Syrup rather than Rich. And it is true a lot of bars use Simple Syrup rather than its richer counterpart. But what does this mean for our drinks?
The answer lies in the difference of ratios. Rich means 2:1 sugar to water ratio and simple is a 1:1 ratio. To reach the same amount of sweetness with a simple syrup you have to use twice the amount of syrup by volume. So instead of 1.5 cl you would be using 3 cl. This means that there is 1.5 cl more dilution in one drink than the other, before even adding ice. For example, I like my Whiskey Sour with 4cl lemon juice. To balance this I would need either 2cl of rich or 4cl of simple syrup. That would mean that before you get to the whiskey you have a volume of 8cl vs 6cl.
Simple syrup on the other hand is less viscous and easier to pour with a speed pourer. Which in turn makes service a bit faster and a bit more accurate. Both factors are relevant when deciding which one to use at your bar. But again decide with reason.
So, let the creativity begin! Did you try any of these yourself? Let me know in the comments.
-
Ingredients: 2 parts Sugar, 1 part Water (by weight)
Tools: scale, high pot, whisk, water cooker/stove/heating plate
Yield: 1200ml
Step one: Boil the water and weigh the sugar.Step two: Weigh out half the amount of the sugar & pour the boiling water over the sugar.
Step three: Whisk until completely dissolved. !!!Make sure that no grain of sugar is still solid, otherwise this could crystallize the whole batch!!!
Step four: Weigh the mixture and add more water if needed to reach a 2:1 ratio by weight. (e.g. 1000g sugar to 500g water; Total of 1500g.
IDEALLY: use a refractometer to measure the °brix. You are looking for 66.6°brix.
Step five: Bottle, label and store appropriately.
-
Ingredients: 2 part Sugar, 1 part + 500g Water, Cinnamon Powder (2g per litre of water)
Tools: scale, fine scale, high pot, whisk, water cooker/stove/heating plate, coffee filter
Yield: 1200ml
Step one: Boil the water and add the cinnamon powder. Let it simmer for 20 min or until you reach the needed amount which is half of the total amount of sugar by weight. Always start with the same amount as sugar plus 500ml as that is the amount that will evaporate in 20 min. This ensures that the intensity stays the same when you scale up or down.
Step two: Filter the cinnamon infusion. (NOT a tea because not Camelia Sinensis)
Step three: Weigh out the sugar & pour the hot infusion over the sugar. Whisk until completely dissolved. !!!Make sure that no grain of sugar is still solid, otherwise this could crystallize the whole batch!!!
Step four: Weigh the mixture and add more water if needed to reach a 2:1 ratio by weight. (e.g. 1000g sugar to 500g water; Total of 1500g.
IDEALLY: use a refractometer to measure the °brix. You are looking for 66.6°brix.
Step five: Bottle, label and store appropriately
-
Ingredients: Sugar, Apples, Shiro Miso Paste, Malic acid, Citric acid, Ascorbic acid
Tools: scale, fine scale, large glass jar/vacuum bags (less sustainable/more manageable), cutting board, knife, Fine mesh sieve/strainer.
Yield: 1200ml
Step one: Weigh & wash the apples. Dry them off with a clean towel.
Step two: Cut them into small cubes, ca. 5mm and put them in the Jar on a scale. Stop when you reach the required amount or scale the recipe to the amount of apples you have to avoid waste.
Step three: add the equal amount of sugar as apples to the jar, adjust the amount of miso and acids to the real amount.
Step four: Seal the jar well and give it a good shake, making sure that all the apple pieces are covered in the sugar-acid-mix. This guarantees an equal extraction and no brownness on the apples, i.e. no oxidation. Let it sit for at least 12 hours, give it a shake every hour for the first 3 hours.
Step five: Strain the syrup through the fine mesh strainer and set the apples aside for further processing.
Step six: Weigh the mixture and add more water or sugar if needed to reach a 2:1 ratio by weight. (e.g. 1000g sugar to 500g water; Total of 1500g.)
IDEALLY: use a refractometer to measure the °brix. You are looking for 66.6°brix.
Step seven: Bottle, label and store appropriately.
-
Ingredients: Lime (zest only) {optional}, Citric acid, Malic acid, Ascorbic acid, Fructose, Dextrose
Tools: scale, fine scale, large container (to fit the full batch), Measuring jug (to fit the full batch), Fine mesh sieve/strainer, cheesecloth, fine zester
Yield: 1000ml
Step one: Weigh the acids and sugars and put them into the container.
Step two: Zest the lime and add to the powders, stir together and let sit for 30 min.
Step three: Pour the warm water over the acids and stir well to dissolve.
Step four: strain the mixture through a cheesecloth, (squeezing encouraged!). Bottle, label and store appropriately.
-
Item description